R1200GS Fuel Tank Filler ‘Neck’ Modification (Fuel filler mod)
By AndyW 25Oct2007
By making this very simple modification to the R1200GS fuel tank filler the tank’s capacity can be improved by a worthwhile amount resulting in improved mileage / range between having to fill up with petrol! 🙂
Tank capacity is increased to an estimated 23 litres giving a minimum of 20 miles extra range up to 40 miles more per tank full depending on how close to the ‘brim’ you fill up and of course riding style.
There are in fact two modifications to be done. You can do either one and benefit or both for maximum improvement.
I expect you have experienced some difficulty filling your fuel tank given that the rubber insert at the bottom of the filler neck is such a snug fit around petrol pump nozzles. This means that fuel pump nozzles almost form a seal with the tank filler neck which doesn’t allow air to be expelled easily as the tank fills with fuel. As air is forced out through this limited space between the the pump nozzle and the rubber seal you can easily get ‘splash back’ of fuel or even a spray of fuel especially when you get anywhere near the tank being full. It’s a little frustrating filling a standard R1200GS fuel tank and downright annoying when you get splashed by petrol and have it running down the outside of your tank!
The first modification takes 10 seconds and is so simple – just remove the rubber insert from the bottom of the fuel filler neck, that’s it, job done! You also benefit from being able to get a little more fuel in the tank.

So what is the purpose of the rubber inner sleeve/insert at the bottom of the filler neck? Well the consensus of opinion is that it’s probably to make it difficult to mistakenly fill up with diesel or in countries where it’s still available, leaded fuel (larger pump nozzle sizes)…no other suggestions have come forward.
The second modification, drilling ‘vent’ holes in the filler neck requires a little work but gives the most benefit in gaining additional tank capacity. Due to the design of the stock tank overflow/vent system a fairly large air pocket is formed at the very top of the asymmetrically shaped plastic tank when fuel reaches the bottom of the fuel filler neck (rubber insert if present). The addition of vent holes in the filler neck allows much of this space to be used for fuel. (See additional comments at the bottom of the page)
I’m sure I don’t need to say this but to cover myself:
WARNING: Petrol (gas, fuel) fumes are highly flammable. A spark from, for example an electric drill’s motor, high speed drill bit, static electricity etc whilst carrying out this modification could have dire results…..BOOM!!
Warnings from the manual 🙂
Fuel is flammable and a hazard to health. Observe all applicable safety regulations.
Attention – Fuel attacks plastics, which become dull or unsightly. Wipe off plastic parts immediately if they come into contact with fuel
The instructions below are based on an original document put together by ukGSer ‘GSmonkey’ with some updating and additions by myself. You can download GSM’s original PDF doc here (1.39mb)
It’s easier to drill the neck if you remove it from the bike. To remove it you’ll need to take out the right side access plate after draining the tank and pull the hoses
Adding Fuel Filler Vent Holes – Instructions
1. REMOVE SIDE PANEL – Undo quarter turn fastenings

2. REMOVE SIDE PANEL – Undo quarter turn fastening under the beak at bottom corner on either side

3. REMOVE SIDE PANEL – Side panel is now only retained with top fixing. This is a push type fixing, so pull to remove. The rubber grommet may come out of the slotted hole, just put this back in. – Do the same on the other side now.


(1) Grommet for push fixing
(2)Front quarter turn fixing below beak.
4. REMOVE LOWER SIDE PANEL (LHS ONLY) – Lower panel on LHS needs to be removed. This has two push fixings, so just give a firm tug supporting the panel near the fixing point.

5. UNDO FIXING TO BEAK – The tank cover is connected to the beak section with one fixing at each side. Undo.

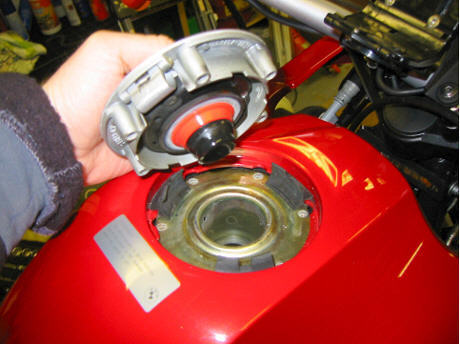
6. FILLER CAP – You may wish to open the filler cap and stuff a rag down the neck to stop anything falling in. (Recommended!) – Undo the six screws around the circumference of the filler cap bezel.

7. REMOVE FILLER CAP – Once the six screws are undone, the filler cap can be removed. Remove the six rubber wedges and stuff a rag down the neck if you haven’t already.
8. REMOVE TANK SIDE COVER (LHS) – Remove screw on left hand side which fixes tank cover to tank.

9. UNDO TANK SIDE COVER (RHS) – Remove screw on right hand side which fixes tank cover to tank.

10. REMOVE TANK COVER – Tank cover and aluminium side pieces come away as one piece.

BARE TANK

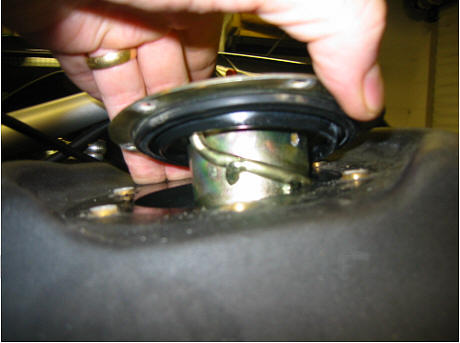
11. PULL OUT FILLER NECK – The filler neck can now be rotated and lifted. The overflow tube can be seen spiralling round the neck, obviously avoid this when drilling!!. The filler neck cannot be removed from the tank due to attached tubing running to the access panel on the right hand side of the tank (unless you empty the tank and remove the RHS access panel to detach the tubing). DO NOT pull the filler neck unit upwards too hard as it may be possible that one of the tubes referred to could detach (unlikely but better safe than sorry!)
NB: IMPORTANT: Wrap rags around the outside of the filler neck unit and in the hole in the tank to catch swarf when drilling. Recommend having vacuum / magnet handy to remove excess from rags prior to removing once you’ve finished drilling. Suggest drill from outside into neck. Caution, do not damage the gasket – pull down to avoid damage. Check that it’s not perishing and replace if not in good condition.
The higher up the neck that you drill the holes the more ‘airspace’ you’ll free up for fuel but see comments at the bottom of the page re the possibility of fuel overflow.

New tank filler vent hole. Drill two or three 3mm to 5mm holes to act as vents.
12. REPLACE TANK COVER – As always it’s the reverse of the removal!! Points to note: First put the tank cover on and align with beak, note the tank cover must slide over the beak connection. Put the two fixings in to the beak finger tight, then re-fit the filler cap. This is tricky as tank cover has to align with neck, wedges and neck with the holes. Should have it sorted in 5mins though.
When re-installing side panels, do the quarter turn connector under the beak last.

14. PULL OUT RUBBER FILLER NECK BUNG (if not already done) – The rubber bung in the filler neck stops air escaping easily when filling the tank. Just shove your finger down the hole and pull out. You can do this even if you don’t want to do the rest of the mod.
Job finished – you can just make out the two new vent holes.

The end! GSmonkey
Here’s a slightly clearer photo I found of DIY vent holes.


R1200GS Fuel tank
Diagram / Schematic You can see the rubber
tubing / pipes attached to
the filler neck as described
above. The 20-litre fuel tank on the R1200GS is made of special, extra-light and impact-proof plastic

Comments / additional things to consider:
# You might find if you brim your tank and then put the bike on the side stand, fuel may come out of the tank overflow tube. This may even happen with the bike on the centre stand if it’s left parked for some time in hot weather. It’s best to only fill the tank to the brim when you know that you are going to ride a fair distance immediately after refuelling e.g.. not just before you get home and park the bike up!
# What’s with the stock / OE setup? I can only think that it is either considered good practice or possibly a legal requirement(?) to leave a certain volume of “airspace” at the top of the petrol tank to allow for expansion of the fuel. Or maybe it’s just one of those designs not as well thought out as it might have been?!!
# Fuel expansion – Petrol station fuel is stored in a huge tanks a several feet underground. As a result it is always going to be at a lower temperature than when in your tank so inevitably it can potentially expand a little after you fill up. Nobody has reported any real issues though and many R1200GS owners have done the filler vent modification.
# USA owners – don’t drill the filler/remove the rubber insert unless you plan to remove the charcoal canister. If you don’t the canister could trap overflow fuel which may allow it to be sucked into the engine causing poor running until its burned through. Again many US GS owners have done the mod and had no problems – the ‘canisterectomy’ is another popular mod for riders in the USA.