Multistrada 1200 – Valve Check / Adjustment & Changing the Timing Belts
Multistrada 1200 Desmo Service – the ‘big’ 15000 mile (24000km) service
♦ Valve clearance check EVERY 15000 miles (24000 kilometers)
♦ Replace timing belts EVERY 15000 miles (24000 kilometers) OR 60 months
Below you will find a guide to checking and adjusting valve clearances and replacing the timing belts on a Multistrada 1200 – at risk of stating the obvious these are jobs for the more confident and experienced ‘home/DIY mechanic’ only…..be prepared for many hours of work typically spread over at least two days! 😉
Tip: Check with your local Ducati Dealer that they have a full/wide range of the various valve shim sizes (bucket shims) in stock…..with the top ends of your engine dismantled it’d be frustrating to find that you had to wait for days for the shims you need! 😉
The article below is a ‘guide’ only and should be used in conjunction with the Ducati Multistrada 1200 Workshop Manual – all usual disclaimers apply!
“The honest answer on how long it took for the hands on part was 2.5 days, probably around 20 hrs. but I was in no hurry taking my time, going to get parts & supply’s, breaks and triple verifying every step I did. Now that I’ve done it I feel I could do it in 10-12 hrs.“
“I hate to admit but I wasted about 2 hours fighting the timing belt trying to get it on until my fingers were sore with blisters. I could get the old belts on with no problem. Next time I will use the factory belts, I think the aftermarket belts I used are slightly smaller or something.“
[AndyW – I wouldn’t expect there to be any difference in belt length between manufacturers……more likely an element of stretching of the old belt and maybe additional flexibility the belt acquires with use?]

NB: The guide below only refers to the adjustment of the valve openers as all closers were within tolerances (notes/photos relating to changing the closing shims would be appreciated;-)
See also: The Ducati Desmodromic Valve System
NB: Download the PDF version of the guide below for printing (PDF to come)
DIY MTS 1200 Valve Check/Adjustment & Timing Belts Change
by ‘CessnaTPA’ aka Tony July2012
—————————————————————————————————-
Text refers to photo/image directly below throughout 😉
—————————————————————————————————-
I recently did the 15K service on my Multistrada 1200 myself and wanted to share what I have learned for others to see what’s involved and maybe inspire others do it yourselfer’s out there (or maybe warn you off lol;-)
I’m not a Ducati mechanic, just a motorcycle enthusiast who likes the satisfaction of working on my own bikes and saving money 😀
My resources for this project were:
~ the official Ducati Workshop Manual
~ ‘Ducati Desmoquattro Maintenance & Modification Guide’ (4th Ed) – www.desmotimes.com
~ CA Cycle Works – www.ca-cycleworks.com/

First remove the duc beak and small black panels. There is a sensor that will need to be unplugged on the right side on the air intake inside the beak (air temperature sensor). You will need 3mm & 4mm Allen wrenches

Remove fuse and storage compartments, lift the back of the rubber storage bin to reveal a hidden bolt.

Remove the tank side covers and the top tank cover (not removed in this pic), it’s held on by three bolts and will lift off over the tank filler assembly , unplug the two vent hoses from the tank.

Remove the fuel tank (much easier when almost empty) two bolts in front of tank and two on the sides (yellow arrows). Lift tank to disconnect two quick connect fuel lines by pinching them. Unplug fuel sensor and pump connectors, carefully lift tank off and don’t lose the front rubber washers.

Remove the rear side panels.

Unbolt this wiring tray and cover to access the rear cylinder head, remove coils and spark plugs.

Remove the radiator

Remove the front & rear cylinder belt covers.

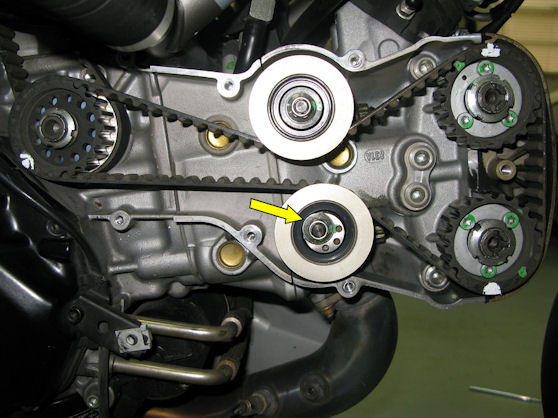
Put front cylinder to TDC (top dead center) using a engine turning tool or rotating rear wheel in 6th gear. Note the marks for TDC

I used white out to mark the pulleys and belts.
Here is the YouTube link from CA Cycle Works that will show you in detail how to remove and install the belts. For now just mark and remove them. CACW Video Part 1 of 3.
- Ducatitech.com: Ducati 749/999 Timing Belt Change Part 1
- Ducatitech.com: Ducati 749/999 Timing Belt Change Part 2
- Ducatitech.com: Ducati 749/999 Timing Belt Change Part 3
Rear cylinder pulleys and belt marked.

Front belt removed.

Remove front and rear head covers….front

…and rear

Closer look at rear cylinder head

Now check the opener & closer valve clearances, motor needs to be stone cold. There are a total of eight clearances on each cylinder that will need to be checked. Four on the intake side and four on the exhaust. Take your time writing and double checking everything, now’s not the the time for mistakes. Rotate the cam so the pointy part of the lobe is pointing straight up. In this pic I’m checking the opener valve clearance, feeler gauge is between bottom of cam lobe and top of opener rocker. Opener range is .005″ to .007″ or .13mm to .18mm

Here I’m checking the closer clearance. Range .002″ to .004″ or .05mm to .1mm

My left intake opener and right exhaust opener clearances were out of tolerance at .008″ on the front cylinder. So time to pull the cams to get to the opener shims. Remove the two cam journals, each have four 12mm bolts, loosen the two inner bolts first. The cam journals were stubborn to remove and I gently used a rubber mallet on the timing belt pulley to get them to pop off, don’t use a screw driver to pry them off.

Be sure to identify the intake & exhaust cams for reinstalling later.

With the cams removed the opener shims are easily accessed.

I removed the right exhaust opener shim with needle nose pliers.

Ducati valve Opener Shim

The shim will have the size stamped on the side. In my case the right exhaust opener shim was 3.10mm, the measurement I took earlier was .2032mm or .008″. Opener range is .13mm to .18mm so I’m out of tolerance .0232mm. Shims are available in .05mm increments (local dealer had them for $10 each) so I need a 3.15mm shim.

The new shim easily goes right in.
All my closer clearances were ok so I didn’t need to remove/adjust the closer shim (yellow arrow) The procedure for that is in the shop manual which doesn’t look too hard.

Opening rocker resting on intake valve shim.

I used the harmonic method to tension the belts using a guitar tuner on a laptop, I used Musical Tuner 1.2, I also verified it with a free App on my cell phone called gStrings, they both read the same frequency, I was surprised how easy it was to adjust the tension, I figured it was going to be difficult.
[AndyW] Ducati use the harmonic method of checking/adjusting timing belt tension and quote the relevant frequencies / tolerances in the Workshop Manual;-)

The YouTube video from CA Cycle Works shows the new belts slipped onto the pulley with little problem. But I couldn’t get it on no matter how hard I tried. I had to take the adjusting pulley off and then it went on without a problem.

I flushed the radiator and drained\flushed the coolant out of the motor by removing this plug that’s on the left side of the motor. Now would be a good time to replace the coolant (this is a good one to go for) and that dirty air filter too.

After getting the valves back in spec you just need to put everything back together in reverse order. I added a little Permatex Moto Seal gasket maker on the previous sealed areas of the cam journals before reinstalling and on the head covers. I also feel it’s a good idea to put some dielectric grease on all the electrical connections before plugging them back in to help prevent corrosion.
I’d also like to add a disclaimer that I’m not a Ducati mechanic, just a motorcycle enthusiast who wanted to share how I did this procedure. If not properly done you can damage your engine! :-O
Super helpful. Thank you!
Very helpful. Thank you.
thx for all the tips
Maybe try laying belts in warm sun before installing (or low heat oven ) next time ;).
…btw, I’m trying to get rear belt top cover off to install new belts … this was a bitch on my 07 S4R …this is a notch or two above bitch due to the vertical mid frame clearance to cover is about null. Any tips out there… I’m attempting w/o the shop manual of course :/. Tried to attach pic, but no option in this comment box.
Roger
2014 MTS GT
17k miles
…i should say i did not remove tank or rear brake lines, just the right side plastic screws to pull plastic out away but not off bike fyi.
Roger
Fantastic content- for all of us that are mechanically inclined and eager to get past the “Ducati Voodoo magic”….
Great information. I’ll never buy a Ducati. That’s a crazy amount of disassembly and time for a valve adjustment.